 Back
Back

 Mid
Mid
 Safe
Safe
 Off
Off


 More
More


Lore & Bio
"I wonder what awaits me at the end of everything…"
For Aeons ago, even before the appearance of languages, there was a clan that thrived which is called the druidic Bear Clan. The members of this clan were wise and put their concentration on figuring out the natural order. Among them, Sylla, the wisest, had been chosen as a representative of his skin to carry on the Seed by the arch forces of nature.
When the trust fulfilled his heart and soul, he could sense the youth and vitality was running in his vein. His mind was flooded with vast amounts of knowledge. He realized that he could project his own will into real life and if he could focus a little bit longer and more intensely, he could transform himself. Unfortunately, the rumor about the word of the Seed and its miraculous power had been whispered to other peoples and as a result, the war happened upon the Bear Clan. Sylla had nowhere to go as all of his familial home was burned into ashes, therefore he carried on this burden and ran into the wild places.
Time flies, the stories and myths about Bear Clan, remarkable civilizations that emerged and collapsed in Bear Clan’s wake as well as Sylla and the Seed were forgotten. Sylla has been waiting for the next word from his immortals for thousands of years, waiting for the end of the war to the realms. He has been waiting in the isolated place til everything comes to the end and the answers for his sacred commitment is revealed. While waiting he also puts himself in readiness to fight and crush whatever would dare to challenge his purpose.
Attribute & Stats
Strength: 18 + 2.5 each level;
Agility: 20 + 2.8 each level;
Intelligence: 13 + 1.4 each level;
Health: 560;
Health regeneration: + 2.05 each second;
Mana: 231;
Mana regeneration: + 0.65 each second;
Damage: 38 - 42;
Amor: 1.33;
Magic Resistance: 25%;
Turn Rate: 0.6;
Attack Range: 550;
Projectile speed: 900;
Attack Animation: 0.33+0.53;
Movement: 325;
Sight Range: 1800/800;
Base Attack time: 1.6 seconds per attack;
Damage Block: 0;
Collision size: 24.
Abilities & Talents
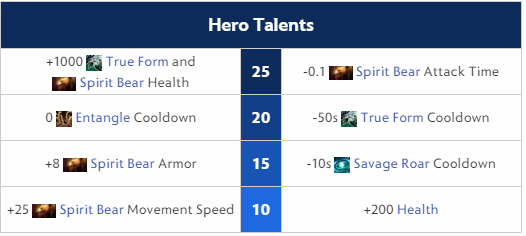
Notes:
-
The health granted by talent will expand the health pool and remain the current health percentage.
Skills building guide
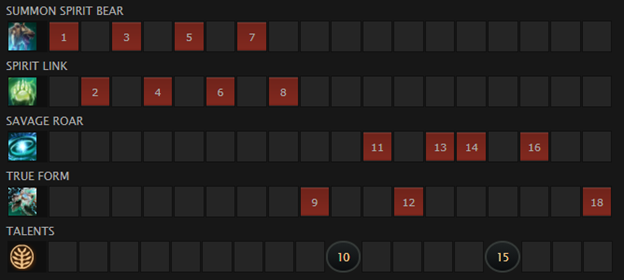
In this build I will focus on guiding you how to play Lone Druid as a hard carry. The first ability I recommend you max out is Summon Spirit Bear as It is Lone Druid main source of damage and durable in the early game which is used to tank the creeps in the lane and jungle.
The second ability to max out is Spirit Link. The reason why you should max out this ability is because of the endurance it grants which can help you and your Spirit Bear survive better in fights. Besides, the lifesteal this ability grants also helps Lone Druid harass the enemies. Furthermore, this ability can help to proc Entangling Claw in teamfight or combat. And Savage Roar is our last priority.
Don’t forget to add a point on True Form in level 6 or whenever possible as with the help from this skill, you can push the lane faster and destroy more buildings. The reason why you can destroy more buildings is due to the Demolish Lone Druid granted while in True Form.
Abilities
 Summon Spirit Bear
Summon Spirit Bear (No Target, Pure)
Effect: Lone Druid swings his hand and summons a powerful Spirit Bear behind him which can be armed with items. The Spirit Bear will be unable to attack if it is 1100 distance away from Lone Druid. When Spirit Bear dies, Lone Druid will lose 20% of his health. Attributes do not affect Spirit Bear. Spirit Bear has its own abilities.
Mana cost: 75
Cooldown: 120
Cast Animation: 0.5+0.63
Max Health as Backlash Damage: 20%
Attack Proximity Range: 1100
Health Bonus per Level: 90
Attack Damage Bonus per Level: 5
Duration: Permanent
Upgradable from Aghanim’s Scepter:
- Attack Proximity Range: Global
Notes:
Whenever Lone Druid levels up, Spirit Bear will gain 5 attack damage and 90 health.
-
To attain this bonus, Spirit Bear does not need to be re summoned as these will apply instantly.
-
The attack granted is considered as base attack damage, not as attack bonus damage.
When casting Summon Spirit Bear for the first time, the Spirit Bear is literally summoned and the following casts will heal or revive Spirit Bear.
-
This means buffs or debuffs still effect when Spirit Bear is created again. In addition, the projectiles are not disrupted when Spirit Bear is re-summoned.
The unit killing the Spirit Bear will receive backlash damage which is pure damage.
-
The backlash damage does not affect the allies or caster when it is denied. However, backlash damage can be triggered if Spirit Bear is executed by neutral creeps.
Spirit Bear is prevented from summoning if it receives damage from a player in the past seconds regardless of the damage value.
-
Even the attack dealing zero damage due to the damage reduction or damage block can block Spirit Bear from being summoned again.
-
If the damage causes the death of Spirit Bear, it can be summoned instantly.
Most of the items can be used by Spirit Bear except Observer and Sentry Wards. It can consume runes.
-
When Spirit Bear uses Hand of Midas, both Spirit Bear and Lone Druid can benefit from the gold and experience .
-
Manta Style and Illusion Rune can not create the illusion of the Bear.
Spirit Bear can not attack, cast spells or use items if it is 1100 range away from Lone Druid.
-
Only allies can see the grey and disarm symbol while everyone can see the animations.
-
Spirit Bear is free from these restrictions if Lone Druid purchases Aghanims’ Scepter. Furthermore, Spirit Bear still survives when Lone Druid dies.
Casting Summon Spirit Bear during True Form will have 0.57 second delayment.
 Spirit Link
Spirit Link (Passive)
Effect: There is a connection between Spirit Bear and Lone Druid which grants the attack speed bonus for both and Lone Druid will get healed when Spirit Bear deals damage.
Attack Speed Bonus: 16/34/52/70
Shared Lifesteal: 20%/35%/50%/65%
Notes:
Undispellable
When Spirit Bear attacks enemy units, it triggers lifesteal and Lone Druid is benefited from it, not Spirit Bear.
-
Lifesteal amplification has an effect on the lifesteal, but only if the amplification source is on Lone Druid.
The leveling up visual effect is only visible when the Spirit Bear is within 1500 range of Lone Druid.
Only Spirit Bear and its owner can be benefited from the Spirit Link.
 Savage Roar
Savage Roar (No Target)
Effect: Both Lone Druid and Spirit Bear generate an unpleasant noise around them which force the nearby enemies to head back to their fountain in fear . In addition, the affected target’s movement speed is increased by 20%.
Mana cost: 50
Cooldown: 38/32/26/20 ( Talent 28/22/16/10)
Cast Animation: 0.1+0.57
Enemy Radius: 375
Enemy Move Speed Bonus: 20%
Enemy Duration: 1.4/1.8/2.2/2.6
Upgradable by Aghanim’s Shard:
- Ally Radius: 700
- Ally Move Speed Bonus: 20%
- Ally Attack Speed Bonus: 60
- Ally Duration: 5
Notes:
Savage Roar is cast by Lone Druid and Spirit Bear at the same time regardless of who made the order.
-
If the others is disabled or affected by status effects, the effect can not be triggered.
-
With Aghanim’s Shard, this limitation is no longer available which means the other can cast the spell even when being disabled or affected by status effects.
-
The status can not prevent the cooldown from being triggered.
The enemies within the active range will be feared which forces them head back to their fountain and prevents them from acting.
Only units controlled by players will be affected.
Have the same cooldown duration with Spirit Bear’s Savage Roar
With upgrades from Aghanim’s Shard, both Lone Druid and the Spirit Bear take advantage of the basic dispel when Savage Roar is upon cast.
-
The Savage Roar caster also benefits from the ally bonus attack and movement speed.
 True Form
True Form (No Target, Self)
Effect: Lone Druid summons a shining circle around him which morphs him into a ranging bear. While in the bear form, he trades his attack range for the resistance as well as the upgrades for Entangling Roots and Demolish.
Mana cost:200
Cooldown:100 (Talent 50)
Cast Animation: 0+0
Transformation Time: 1.933
Base Attack Time: 1.7
Armor Bonus: 8/10/12
Health Bonus: 500/1000/1500 (Talent 1500/2000/2500)
Attack Range Loss: 325
Duration: 40
Notes:
Lone Druid will be disabled and immobile when True Form is upon cast and it can not be disrupted.
Lone Druid will be transformed into a melee hero temporarily with 225 attack range.
-
Which means when using items, he will be treated as a melee hero.
-
The transformation does not affect the attack range bonuses.
The health bonus that Lone Druid receives during True Form is not considered as a heal.
-
When the duration of this spell reaches its end, his health remains, only the health bonus is removed.
-
The maximum health increase granted by talent does not affect the True Form is active at this moment but changes the Spirit Bear’s health.
While in the form of the bear, Lone Druid is granted Demolish and Entangling Claws which is in the same level with Spirit Bear’s abilities:
-
Lone Druid’s Demolish will deal 15%/30%/45%/60% bonus damage on the buildings.
-
The Lone Druid’ proc chance is 30% when casting Entangling Claws.
If Lone Druid dies during True Form, He is still in the form of the bear after respawning.
Changes the model and voice of Lone Druid.
Effective items guides
Early game
 Healing Salve
Healing Slave: instantly restores a great amount of health so Lone Druid can spend less time at the fountain.
 Tango
Tango
Tango: keeps Lone Druid in lane longer by regenerating his health within a specific period.
 Iron Branch
Iron Branch: provides a small amount of attribute which allows Lone Druid to last hit easier.
Mid game
 Phase Boots
Phase Boots: is a great combination with Spirit Link due to the movement speed and attack damage it grants.
 Magic Wand
Magic Wand: grants bonus stats as well as a reliable source of restore health and mana.
Late game
 Hurricane Pike
Hurricane Pike: grants Lone Druid the attack range that he can deal damage from a long distance on both enemies and towers. Besides, Hurricane Thrust can help Lone Druid run away or put himself in a great position.
 Mjollnir
Mjollnir: grants a great amount of damage which allows Lone Druid to push the lane or farm quickly.
Situation items
 Tranquil Boots
Tranquil Boots: grants a significant amount of movement speed which allows Lone Druid to keep up with Spirit Bear. Besides, it also grants the health regeneration to keep Lone Druid’s health in the sustain state.
 Mask of Madness
Mask of Madness: increases the damage output by granting attack speed and damage. However, using Berserk must be prudent as it provides a huge amount of attack speed and movement speed but in the trade of armor.
 Solar Crest
Solar Crest: the armor and attack speed granted by this item make Spirit Bear become tankier. Besides , it also makes the gank or siege have a higher chance to succeed due to the increase in the effectiveness of Entangling Claws and Demolish.
 Boots of Travel
Boots of Travel: reduces the cooldown of Town Portal Scroll which allows him to teleport around the map easier.
 Aghanim's Scepter
Aghanim’s Scepter: frees Spirit Bear from Lone Druid which means it can be a split push in one lane and Lone Druid in the other lanes.
 Black King Bar
Black King Bar: The immunity granted from BKB can prevent Lone Druid from being rooted, stunned or other disables by enemy heroes which means he can chase the enemy easily and deal damage without any disruption.
 Pipe of Insight
Pipe of Insight: makes Lone Druid resist the magic damage better.
 Desolator
Desolator: increases the damage output by granting attack damage as well as armor reduction, including buildings.
 Butterfly
Butterfly: allows Lone Druid to survive better in combat by granting evasion. Furthermore, it also directly increases the damage output by providing attack damage.
Enemies & Allies
Allies
 Beastmaster
- Inner Beast affects both Lone Druid and his bear and together with Beastmaster's summons they can push incredibly fast.
 Lycan
Lycan
- Howl affects both Lone Druid and his bear and together with Lycan's summons they can push incredibly fast.
 Ogre Magi
- Bloodlust useful both for Lone Druid and especially for Spirit Bear (due to his low base attack time) increasing their damage output.
 Omniknight
- Omniknight in a team is a great advantage to all tanky carries. Purification for healing and dealing damage to nearby enemies, Heavenly Grace for status resistance, Degen Aura for slowing down opponents and Guardian Angel to protect from physical damage.
Counters
 Phantom Assassin
-
With Blur, getting away from Lone Druid and Spirit Bear is no big deal for Phantom Assassin.Furthermore, the evasion this ability grants also reduces the damage output from the Spirit Bear which means lower the chance to trigger Entangling Claws. In the late game, Lone Druid can not carry the team as well as Phantom Assassin.
 Bristleback
-
The damage that Lone Druid and The Spirit Bear will be reduced significantly when Bristleback casts Bristleback. Chasing and killing Lone Druid and Spirit Bear is an easy task for Bristleback thanks to the slow and armor reduction from Viscous Nasal Goo and damage from Quill Spray.
 Necrophos
- Casting Ghost Shroud can slow Lone Druid and The Spirit Bear which allows him to kill them or escape when being chased. High HP of Spirit Bear and Lone Druid in True Form can not stand the burning effect from Heartstopper Aura.
 Grimstroke
-
Grimstroke’s Souldbind will bind Lone Druid and his bear together and prevent them from escaping.
 Outworld Destroyer
-
Lone Druid and the Spirit Bear can not tolerate the heavy damage dealt by Arcane Orb and Sanity’s Eclipse. When being trapped by Astral Imprisonment, the Spirit Bear can not run away which directly affects the damage output of Lone Druid.
 Underlord
-
Underlord’s Firestorm can end Spirit Bear and Lone Druid life in True Form quickly. Lone Druid will be kited to death by Underlord’s allies when Underlord casts Pit of Malice.
 Winter Wyvern
- Winter’s Curse can use Lone Druid’s Bear against his allies. AoE damage from Splinter Blast can wear down the health of Lone Druid and his Bear easily.
 Lich
Lich
-
Lich’s Chain Frost can clear up the Lone Druid and his Bear quickly. Sinister Gaze upgraded by Aghanim’s Scepter can drain the mana of Lone Druid and hypnotize him and his bear.
 Tinker
-
With the upgrades from Aghanim’s Scepter, Tinker’s Laser can deal damage and apply debuff on Lone Druid and Spirit Bear.
 Death Prophet
-
Lone Druid in True Form and the Spirit Bear are the perfect prey for Spirit Siphon due to their high HP.
 Phoenix
-
The Spirit Bear attack can not break the Supernova Egg which means they can not destroy the egg before it bursts out.
Items Counter
 Heaven's Halberd
Heaven Halberg: Heaven’s Halberd’s great damage output can kill Lone Druid and his Bear in a nick of time.
 Ghost Scepter
Ghost Scepter: turns the target into ethereal which helps the owner avoid damage from Lone Druid and his bear.
Favorable Matchups
 Nature's Prophet
Nature’s Prophet: Teleportation is useless when Nature’s Prophet is caught in Entangling Claws
 Silencer
Silencer: Lone Druid is immune to Silencer’s disabilities.
Game plan
Early game
Like other carry heroes in the early game, farming is always Lone Druid’s priority. With the help from the Spirit Bear, Lone Druid can clear the creep quickly and push the lane faster which allows him to farm the neutral creeps in the jungle . If you are dueling with a mobility hero in your lane,you should order the Bear to attack and trigger Entangling Claws which allow you to deal more damage on the enemy and secure the kill. With the heal getting from the Spirit Link, you can stay in the lane longer to farm the creeps. Keep in mind that you need to farm to get your power accelebrate rather than trading skills.
Mid game
With some items and maximized Summon Spirit Bear, you can start to roam to other lanes to secure the kill. You can farm the creep wave on behalf of your teammate but remember to consider it carefully as you don’t want your teammate to be useless later. Only roaming when you already clear the creep waves in your lane, execute the opponent in the lane or have an advantage by destroying the tower. To optimize the efficiency, getting back to your lane right after the gank is a must. Of course don’t forget to control the runes while roaming as they are useful resources so that you can spend more time on the lane instead of the fountain.
Late game
Your objectives in the late game are quite the same with the mid game but this time you and your team might play around the keys objectives like Roshan and towers. Your mission in the late game is to find a great position to deal as much damage as possible. You can use Spirit Bear as an initiator in the place where your team doesn't have the vision or go split push. Depending on the rival damage, you should consider various items to purchase that can help you survive longer in the team fight and deal more damage.