 Back
Back

 Off
Off
 Safe
Safe
 Mid
Mid


 More
More


Lore & Bio
"Fate weaves the threads of our lives together. Fate also wields the blade that cuts them short."
The fabric of creation plays an important role in balancing the order of the universe and any damage of this fabric will cause the destruction of the whole universe. That's why it needs to be taken care of prudently.And the creatures who were in charge of this job were Weavers, the insect-like beings. They repaired the fabric from fading, kept it tight as well as guarded it against the attack and destruction of other creatures who try to lay eggs on the torn regions. Among the weavers, the best known one was Skitskurr, the master of Weaver.
Like other weavers, He was in charge of a part of the fabric of reality. However, doing this tedious job on a daily basis had made him become bored and he wanted to create and weave his own realities. He started to work his plan out by making minimal changes on his own fabric but his work had drawn the attention of the guardians. The guardians came with a pair of scissor on their hands and cut his work out of the fabric and rewove it without him. Other Weavers turned their backs on him and left him alone. But instead of being tormented by this like other Weavers, he was full of joy as he knew was free now and he could weave his own reality now.
In-game, Weaver is described as:
“Weaver has no trouble evading enemies to position himself for another strike. Slipping in and out of sight, he avoids death by rewinding himself to an earlier position and health state. His arsenal of elusive skills ensures he is always a critical nuisance to his foes.”
Attribute & Stats
-
Strength: 16 + 2 each level;
-
Agility: 17 + 3.1 each level;
-
Intelligence: 20 + 2 each level;
-
Health: 520;
-
Health regeneration: + 2.6 each second;
-
Mana: 315;
-
Mana regeneration: + 1.75 each second;
-
Damage: 53 - 63;
-
Amor: 2.83;
-
Magic Resistance: 25%;
-
Turn Rate: 0.6;
-
Attack Range: 425;
-
Projectile speed: 900;
-
Attack Animation: 0.55+0.36;
-
Movement: 275;
-
Sight Range: 1800/800;
-
Base Attack time: 1.8 seconds per attack;
-
Damage Block: 0;
-
Collision size: 24.
Abilities & Talents
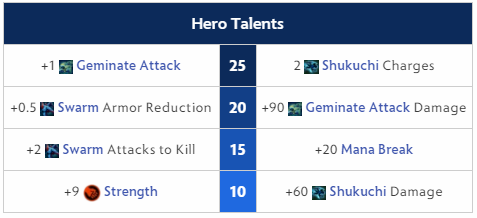
Notes:
-
The bonus stats that Weaver receives when adding a point in the strength talent are 180 health and 0.9 health regeneration.
Skills building guide

In this build I will focus on guiding you how to play Weaver as the bot laner. The first ability I recommend you max out is Shukuchi as it is extremely useful to harass the enemy or dodge the enemy’s projectiles. Besides, the movement speed granted can be useful while chasing the enemy or escaping from the gank.
The second ability to max out is Germinate Attack because of the huge amount of damage it can cause which can help you kite or quickly finish the enemy with the help from Shukuchi. The Swarm is your last priority but you should place one point on this ability at level 4 to increase your damage output.
Abilities
 The Swarm
The Swarm (Point Target, Physical)
Effect: Weaver releases a swarm of 12 tiny weavers that sticks on any enemy unit that they encounter on their way. They deal the damage on the target and reduce its armor until it dies.
Mana cost: 110
Cooldown: 44/36/2/20
Cast Animation: 0.3+0
Cast Range: 3000
Max Travel Distance: 3000
Beetles Spawn Radius: 300
Beetles Latch Radius: 100
Number of Beetles: 12
Non-Hero Attacks to Destroy: 8 (Talent 10)
Hero Attacks to Destroy: 4 (Talent 5)
Tick Interval: 1.15/1.0/0.85/0.7
Damage per Tick: 18/20/22/24
Armor Reduction per Tick: 1 (Talent 1.5)
Beetle Duration: 16
Upgradable by Aghanim’s Shard:
- Cooldown: 40/32/24/16
Bettle’s stats:
- Level: 2
- Duration: 16
- Health: 100
- Health regeneration: 100
- Armor: 0
- Magic Resistance: 0%
- Status Resistance: 0%
- Collision size: 8
- Vision range: 321
- Bounty: 32-34
- Experience: 20
- Model scale: 1.9
Notes:
Undispellable
The speed that the swarm travels is 750 which takes them 5 seconds to reach its end.
Only when sticking onto the enemies, the beetles will deal damage.
Beetles always auto-attack the enemy within range.
The swarm of tiny bugs spawn arbitrarily around Weaver within the 300 radius.
The beetles will stick to the enemy units within the 100 radius except there is a beetle stick onto the target already.
-
Each enemy unit will be latched by only one beetle no matter how many times The Swarm is cast. Furthermore, the duration won’t be refreshed.
-
Invisible or hidden units won’t be found or affected by the beetles but the invulnerable units can be affected.
-
Whenever the beetles already latch on the targets, turning hidden can’t not get rid of them.
-
If the targets turn invisible after latching and out of the True Sight, the beetles will be removed immediately and no one receive bounty and experience from that.
-
With upgrade f rom Aghanim’s Shard, even turning invisible can not help the targets get away from the beetles and the targets will be revealed.
-
The Chronosphere of Faceless Void can instantly end the life of beetles within the active range. However no one receives the bonus or experience from this.
Furthest range that beetles can latch the enemy units is up to 3400.
-
The position of the beetles when attached on the targets is 64 range in front of the unit.
Right after attaching on the targets, the beetles deal damage every 1.15/1.0/0.85/0.7 seconds which means the Swarm can make up to 14/17/19/23 attacks.
-
While the beetles are attached to the target, the damage will be dealt on the set intermissions.
-
This means Weaver is the source that causes the damage and this damage is influenced by outgoing damage manipulation and spell lifesteal.
-
Damage Block can not disable the damage from the Swarm.
-
The total damage that each beetle can deal on a single target before reductions are up to 252/340/418/552 damage.
- The armor reduction rebuff is separate from the damage. It can reduce armor on the ethereal target but not the invulnerable one.
-
The armor reduction effect will disappear at the same time with beetles when they die.
-
The armor reduction debuff will be applied first then the damage in every intermission when The Swarm is cast.
-
The total amount of armor that The Swarm can reduce is up to 14/17/19/23 (Talent 21/25.5/28.5/34.5)
While traveling towards, the beetles provides the flying vision. The vision is also granted while the beetles are attached to the target.
 Shukuchi
Shukuchi (No Target, Magical)
Effect: Weaver turns into a transparent state and reaches his max movement speed. Besides, he deals damage when passing any enemies.
Cooldown: 12/10/8/6 (Talent 0)
Mana Cost: 70
Cast Animation: 0+0
Fade Time: 0.25
Damage Radius: 175
Damage: 100/125/150/175 (Talent 160/185/210/235)
Haste Speed: 550
Duration: 4
(Talent) Number of Charges: 2
(Talent) Charge Replenish Time: 12/10/8/6
Notes:
Other channeling abilities of Weaver won’t be disrupted by casting Shukuchi.
The projectile which is thrown before Weaver turns invisible can not hit him if this place has no True Sight of the enemy.
Each unit will be damaged once per cast.
During the effect of Shukuchi, Weaver can not be slowed as the haste is applied and phased movement is granted.
-
Weaver will turn invisible immediately after casting Shukuchi which is different from other phasing invisibility spells.
In the transition time from visible to invisible, Weaver can attack or cast spells without disrupting the invisibility.
Invisibility will be disrupted if it reaches to the end of its duration or carries out an attack.
-
Picking up or dropping items do not affect the invisibility
Level 25 Talent grants Weaver one charge in Shukuchi.
 Geminate Attack
Germinate Attack (Unit Target, Instant Attack)
Effect: Weaver can launch two attacks simultaneously.
Cooldown: 9/7/5/3
Effect Delay: 0.25
Number of Extra Attacks: 1 (Talent 2)
Attack Damage Bonus: 10/25/40/55 (Talent 100/115/130/145)
Upgraded by Aghanim’s Shard
- Beetle Targets Search Radius: 1200
Notes:
Undispellable
Upon leveling Geminate Attack the first time, it has Autocast on by default.
When Germinate Attack is leveled up for the first time, it will be put in Autocast mode.
-
Attack modifier or on-hit effects still apply on these instant attacks like normal attacks. These instant attacks can not be disarmed.
-
Smoke of Deceit’s invisibility can not be disrupted by these instant attacks.
-
The first attack won’t cause bonus damage, only the latter attacks deal extra damage.
When the projectiles from Germinate attack are launched, they will follow the target regardless of how far away the target got.
-
If the first attack kills the target, the latter attack will follow and hit on the dead target.
-
The Germinate Attack can not be launched when Waever dies.
The Germinate Attack can affect enemy buildings, Courier and wards but Observer and Sentry Wards are the exceptions.
-
When it is cast manually, It does not affect the buildings.
With upgrades from Aghanim’s Shard, any enemies within 1200 range radius which is affected by the Swarm will be caused damage by Germinate Attacks.
-
These attacks won’t be applied attack modifiers or on-hit effects like the Germinate Attack on the single target.
-
These attacks are launched at the same time with the Germinate Attacks on the single target.
-
The beetles from the allies can trigger this effect too.
 Time Lapse
Time Lapse (No Target)
Effect: Weaver travels back to the point he was in five seconds ago which gets back his HP and Mana from that time. However, the cooldown, golds or experience are not affected.
Cooldown: 70/55/40
Mana cost: 150/75/0
Cast Animation: 0.3+0.53
Lapsed Time: 5
Upgradable by Aghanim’s Scepter:
- Cast Range: 600
- Mana cost: 20
- Can use on Allied Heroes
Notes:
Undispellable.
When casting Time Lapse, Weaver can dodge the projectiles and apply strong dispel.
After getting back to the position that he was 5 seconds ago, Weaver is ordered to stop.
-
The cast backswing of this ability will be called off immediately.
-
⇧ Shift-queue commands are still on effect.
Only change Weaver’s position, health, mana and disable the debuffs but the buffs still remain.
Time Lapse only removes the debuffs that can be disabled and they will be removed entirely regardless of their effect duration on Weaver.
Time Lapse only manipulates the health of Weaver which means it does not synergize with any on-damage effect.
The caster won’t be killed when casting it after respawning. Instead, he will be moved to the position with the same health and mana before the death.
With upgrades from Aghanim’s Shard, Time Lapse becomes a spell that can cast upon other allies.
-
It can affect heroes, including clones and illusions but not creep-heroes.
-
Can apply the cast on himself by ↓↓ Double-tapping.
-
The channeling abilities upon cast are not disabled by Time Lapse when it applies on the allies.
-
Unlike the cast applied upon himself, the Time Lapse cast on allies will trigger cast backswing.
-
Unlike casting on himself after respawning,When Time Lapse is cast on the ally heroes who just respawned, It does not affect on their health, mana or position.
Effective items guides
Early game
 Healing Salve
Healing Salve grants bursting health restoration which saves him in dangerous situations.
 Tango
Tango
Tango keeps Weaver in lane longer by granting some regeneration.
 Clarity
Clarity keeps Weaver’s mana in the sustainable state.
 Slippers of Agility
Slipper of Agility grants bonus attributes which help Weaver last hit the creep easier.
 Circlet
Circlet is an item to support Weaver from last hit the creep by granting a few extra stats and can be upgraded into Wraith Band later.
 Magic Stick
Magic Stick instantly restores a pinch of mana and health which helps Weaver to cast more Shukuchi.
 Boots of Speed
Boots of Speed: increases mobility.
 Blight Stone
Blight Stone synergizes well with The Swarm as it also reduces the armor of the target.
Mid game
 Magic Wand
Magic Wand a great update from Magic Stick which has more recharge capacity.
 Power Treads
Power Treads grants extra bonus stats besides the attack speed.
 Linken's Sphere
Linken’s Sphere increases the health capacity and creates a shield to block spells which in combination with Shukuchi make Weaver hard to be executed.
Late game
 Diffusal Blade
Diffusal Blade: Besides granting extra damage and attack speed, It provides a slow in the Weaver’s attack which helps Weaver kites the enemies and prevent them from escaping. Furthermore, Diffusal Blade’s Mana Break can stack with Mana Break which is granted by Weaver’s talent.
 Desolator
Desolator synergizes well with The Swarm and Germinate Attack by granting the extra damage and armor reduction which help him finish the enemies within a few seconds.
 Black King Bar
Black King Bar protects him from being disabled and caught in the teamfight by granting the spell immunity.
Situation items
 Hurricane Pike
Hurricane Pike: besides the great amount of bonus attribute, attack range and mobility it grants, its activation can instantly increase the distance between Weaver and the enemies which is really useful when escaping.
 Heart of Tarrasque
Heart of Tarrasque: A total 1300 health and 14.5 health regeneration are what Weaver receives when buying this item. In combination with Time Lapse, the enemy team will spend tons of time to kill Weaver.
 Daedalus
Daedalus grants a great amount of damage and the chance to deal critical attack.
 Butterfly
Butterfly grants various bonuses from damage, armor to evasion which makes Wear more endure and increases its survivability.
 Monkey King Bar
Monkey King Bar: grants decent magical damage, piercing damage and a little attack speed.
 Satanic
Satanic: Besides the base stats, status resistance and lifesteal it grants, its activation synergizes well with Time Lapse which increases the survivability of Weaver.
 Eye of Skadi
Eye of Skadi grants Weaver great bonus stats and its activation instantly weakens the enemy hero
 Mjollnir
Mjollnir: can help Weaver farm better by granting a great amount of attack speed to enhance Germinate Attack and to farm better.
 Aghanim's Scepter
Aghanim’s Scepter: Besides reducing the Time Lapse’s cooldown significantly, It allows Time Lapse to cast on other allies which is extremely useful to save allied heroes from being caught in the combat or teamfight.
Enemies & Allies
Allies
 Crystal Maiden
Crystal Maiden: With Arcane Aura, Weaver can have more mana regeneration which helps him cast more Shukuchi and The Swarm. Weaver can distract enemy heroes by harassing them and reducing their armor so Crystal Maiden can have enough time to channel Freezing Field and deal more damage.
 Alchemist
Alchemist can grant Weaver an Aghahim’s Scepter.And with Time Lapse upgraded by Aghanim’s Scepter, Weaver can increase Alchemist’s survivability by casting it on Alchemist while casting Chemical Rage.Besides, the Acid Spray’s armor reduction can stack with The Swarm.
 Vengeful Spirit
Vengeful Spirit: Wave of Terror’s armor reduction can stack with the Swarm. By granting the bonus damage to the nearby heroes, Weaver can deal more damage when casting Germinate Attack. Nether Swap and Time Lapse combination create a great combo for Weaver to escape from a gank and still have a great amount of health and mana.
Counters
 Axe
Axe
Axe: By using Berserker’s Call, Axe can easily prevent Weaver from casting Time Lapses. It also reveals Weaver while casting Shukuchi. Counter Helix can take advantage of Weaver’s fast attack speed granted by Germinate Attack and other items. In combination with Blade Mail, Axe will deal more damage than what Weaver has dealt. If Weaver is in a low health state, he must be careful as Axe can wipe him out immediately by casting Culling Blade and leave Weaver zero chance to cast Shukichi and Time Lapse. Battle Hunger can easily break the spell immune shield from Linken’s Sphere.
 Bloodseeker
Bloodseeker: Rupture is simply inescapable for Weaver even when casting Shukuchi or Time Lapse. Furthermore, using Time Lapse can not disable the effect of Rupture on Weaver. Thirst can reveal Weaver’s position during Shukuchi’s duration whenever his health is low. Blood Rite in combination with Rupture can put Weaver in difficult situations whether to take damage from the latter or be silenced for a long duration.
 Drow Ranger
Drow Ranger: the great attack speed granted by Precision Aura makes Weaver difficult to handle in his laning phase. There is nearly no chance for Weaver to run away when Drow Ranger casts Gust and Frost Arrow. Drow Ranger can quickly clear off the beetles from The Swarm due to her high attack speed.
 Faceless Void
Faceless Void: Chronosphere confines Weaver in an orb so Weaver can not get away with Shukuchi and can be executed easily once caught . With the help from Time Dilation by extending enemy cooldowns, Weaver can not cast Shukuchi or Time Lapse more frequently which reduces his mobility and survivability significantly.
 Night Stalker
Night Stalker: Weaver stands no chance to use Shukuchi or Time Lapse when Night Stalker casts Crippling Fear. With the great night vision and the help from Dark Ascension and Gem of True Sight, Night Stalker can figure out Weaver's position easily and kill him. With the high attack speed granted when casting Hunter in the Night, The Swarm’s beetles can be wiped out in a nick of time.
 Nyx Assassin
Nyx Assassin: The long duration stun from Spiked Carapace can reveal the position of Weaver while Weaver uses Shukuchi, and then Nyx Assassin can cast Impale to stun and deal more damage. Vendetta can put Nyx Assassin in a great position to cast Impale and use Spiked Carapace besides the huge amount of damage it causes. If Weaver hasn't purchased Aghanim’s Scepter, Nyx Assassin can neutralizeThe Swarm beetles while using Vendetta.
 Skywrath Mage
Skywrath Mage: With a long attack range and low cooldown, Skywrath Mage can cast this spell more frequently and harass Weaver without being approached. It is also used to pop the shield of Linken’s Sphere. The silence debuff from Ancient Seal prevents Weaver from casting Shukuchi and Time Lapse.
 Slardar
Slardar: Slithereen Crush disables the channelling abilities and stun Weaver so he can not run away by using Shukuchi and Time Lapse . By reducing armor on the target, Corrosive Haze can increase the damage caused on the Weaver. Besides, it also reveals the position of Weaver while using Shukuchi. Furthermore, It can be used to pop the shield of Linken’s Sphere. The movement speed bonus granted by Guardian Sprint can help Slardar dodge Weaver’s bugs.
 Zeus
Zeus
Zeus: Arc Lightning is a useful tool to break the shield from Linken’s Sphere. Lightning Bolt or Nimbus (upgraded from Aghanim’s Scepter can prevent Weaver from ganking as the leaping effect can reveal the location of Weaver during Shukuchi. The huge amount of damage caused by Thundergod’s Wrath can instantly kill Weaver which leaves him no chance to cast Time Lapse at low health.
Items Counter
 Orchid Malevolence
Orchid Malevolence can prevent Weaver from escaping by casting Shukuchi and Time Lapse with the silence effect. It can be used as a tool to break the shield from Linken’s Sphere.
 Abyssal Blade
Abyssal Blade and Scythe of Vyse with the stunning and hexing debuff, these items can stop Weaver from casting spells and running away.
 Shadow Amulet
Shadow Amulet can be used to dodge Weaver’s bugs when he hasn’t purchased Aghanim’s Shard.
 Sentry Ward
Sentry Ward in the early game and Gem of True Sight in the late game are items to reveal the positions of Weaver during Shukuchi which prevents him from ganking.
 Buckler
Buckler: the armor granted from this item can reduce the damage which is dealt by Weaver.
 Ghost Scepter
Ghost Scepter makes Weaver’s attack less effective.
Favorable Matchups
 Ancient Apparition
Ancient Apparition: Shukuchi can easily disabled Cold Feet. During Shukuchi, Weaver can not be slowed by the Ice Vortex. With the immobility skill set and low health pool, Ancient Apparition is nearly impossible to escape from Weaver.
 Brewmaster
Brewmaster: with the slow movement speed and low in armor, Brewmaster is struggling in the laning phase against Weaver. Brewmaster has no tool to catch Weaver except the slow debuff granted by Hurl Boulder but it can be disabled quite easily.
 Lifestealer
Lifestealer: Open Wound can not slow Weaver during Shukuchi. Without any lockdown abilities, Lifestealer can not control Weaver and can be kited with ease.
 Undying
Undying: With Germinate Attack, Weaver can quickly wipe out the zombies and the tombstone. When Weaver turns invisible during Shukuchi, the zombies attacking him will disappear too. With his skill set, It is impossible for him to catch Weaver.
 Pudge
Pudge
Pudge: With the high movement speed from Shukuchi, Weaver can avoid Meat Hook easily. Besides, Rot doesn’t slow him during Shukuchi. The Hook doesn’t disable Weaver so he can still cast Time Lapse and neutralize the damage as well as displacement. With low attack speed, Pudge might struggle to get the beetles out of him.
 Sven
Sven
Sven: As Linken’s Sphere is the core item of Weaver which can block Storm Hammer, the only disable ability that Sven has. Therefore, It’s nearly impossible for him to win the duel with Weaver.
 Ursa
Ursa
Ursa: Shukuchi aren’t affected by the slow debuff of Earthshock. With Time Lapse, the burst damage from Ursa will become a waste. Besides, Weaver's skill set allows him to kite Ursa easily. The beetles from The Swarm can disable Ursa’s Blink Dagger.
 Wraith King
Wraith King relies on Wraithfire Blast to pop Linken’s Sphere of Weaver which can be disjointed easily when Weaver uses Shukuchi and Time Lapse. Wraith King has no tool to control or chase Weaver so Weaver can chase or escape from Wraith King easily. Without Aghanim’s Shard, Wraith King is nearly impossible to cast Reincarnation when Weaver uses Diffusal Blade and the help from Mana Break talent.
Game plan
Early game
First, The reason you should pick Weaver as a team carry is when you notice that the enemy team doesn't have many disable abilities. That means you can play aggressively in the bot lane and harass the enemies more frequently or even can get away from the gank without any scratch.
At the early game for the carry, Farming is the number one priority. Use Shukichi to harass the enemies when they try to last hit a creep but must keep the creep wave in the safe position so you can avoid any gank in the early game.
Mid game
Your priority is still farming but be ready to engage in any imminent fights.Due to the high mobility you can move to the fight and be one leg ahead. Make sure you only do that when clearing up the creep waves in your lane or winning your lane. Immediately go back to your lane when finishing the gank to maximize the efficiency and destroy the wards on your way back to the lane if possible.
Late game
Your objectives in the late game are quite the same with the mid game but this time you and your team might play around the keys objectives like Roshan and towers. As a main source of damage, keeping your position and finding a good spot to freely cast Germinate Attack is what you must do. You can try to split push if possible as besides the gold you accumulate, you can gain more vision for your team and put a lot of pressure on the enemy’s shoulder when they want to control the key objectives on the map.