 Back
Back

 Mid
Mid
 Off
Off
 Safe
Safe


 More
More


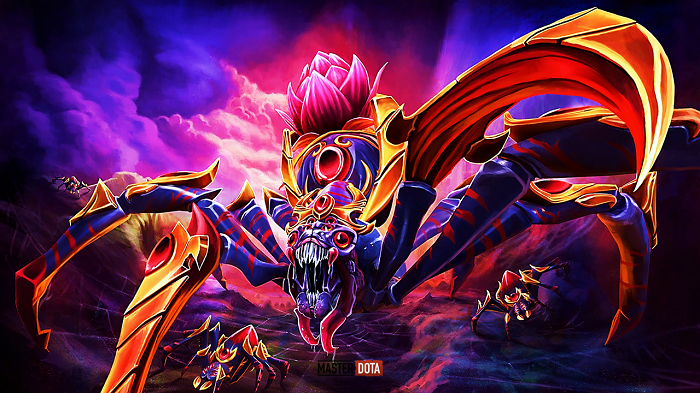
Lore & Bio
For centuries, Black Arachnia the Broodmother lurked among lava caves deep beneath the smoldering crater Mount Pyrotheos, devoted to caring for and nurturing millions of baby spiders, keeping them alive. safe before they were large enough to be sent out to hunt in the world above.
Unexpectedly, one day, the greedy prime minister Ptholopthales suddenly appeared, and began to build his private Ziggurat building on the slopes of a long-dead volcano. Because he knew, even if someone dared to dream of his fortune, he would not be able to survive if he dared to cross the path of death haunted by spiders.
Definitely, Ptholopthales' calculations had a big impact on Broodmother's life. After a few centuries of peace, Black Arachnia suddenly discovers that there are uninvited guests who are constantly disturbing her life - armed thieves, daring horsemen "brave and unscrupulous" ”, or even young noblemen – their taste is very delicious, and also has a great influence on the “innocent children'' she is taking care of.
Tired of the break-ins, Broodmother "visited" Ptholopthales, and after he showed no intention of cooperating at all, she "gently" used spider silk to tie him up, then brought him home. “gift” for the “newborns”_what a special birthday party.
Unfortunately, the disappearance of the owner of that Ziggurat court merely made the curious even more daring. Then, after a newborn "baby" was stomped to death by a reckless adventurer, Black Arachnia finally exploded (her string of reason was finally broken). Broodmother crawled out of the nest, headed for the world above, vowing to wipe out all who could become a danger to her children. She would kill the last Hero if necessary, and would not stop until she could ensure that her precious "babys" could be safe once more in the "nursery." mine.
Attribute & Stats
Level: 0 1 15 25 30
Health: 200 560 1440 2320 2680
Health regen: +0.25 +2.05 +6.53 +10.93 +12.73
Mana: 75 291 627 1011 1155
Mana regen: +0 +0.9 +2.3 +3.9 +4.5
Armor: 0 3.17 11.1 18.77 21.93
Damage Block: 16 (50%)
Magic Resistance: 25%
Status Resistance: 0%
Damage: 29‒35 48‒54 95‒101 141‒147 160‒166
Attack Rate: 0.74/s 0.85/s 1.13/s 1.4/s 1.51/s
Attack Range: 150 (600)
Attack Speed: 125 (1.7s BAT)
Attack Animation: 0.4+0.5
Projectile Speed: Instant
Movement Speed: 280
Turn Rate: 0.6
Collision Size: 24
Vision Range: 1800 • 800
Legs: 8
Gib Type: Goo
Ability Upgrades:
- Upgradable by Aghanim's Scepter.
- Upgradable by Aghanim's Shard.
Abilities & Talents

Skills building guide
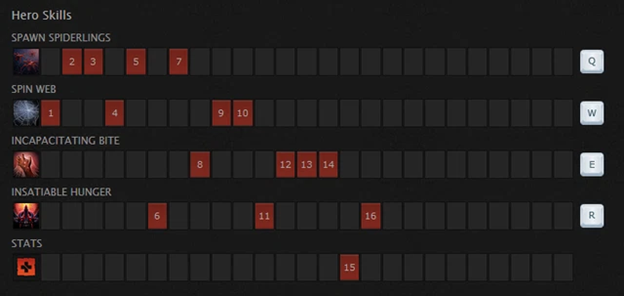
The way to build skills above is applied by a lot of gosu, and I also find it quite reasonable: you need at least 4 cobwebs to stay in lane, push turrets, so 1level Spin web (W) in the stage head is not enough. With 30% attack rate in the early stages, this is not a small number, not to mention the skill Incapacitating Bite (E) gives a little bit of a slow, so 1 point is not superfluous at early levels, ultimate you can get at level 7 and the right level at next levels. Of course, Broodmother's trademark skill Spawn Spiderlings (Q) is maxed first.
Abilities
 Spawn Spiderlings
Cost: 120 mana.
Cooldown: 10 seconds
Range of use: 700
Effect: Fires a parasitic egg sac on the specified target, dealing 75/150/225/300 damage, if the target is killed by this skill or shortly afterwards, the monsters Baby spiders will emerge from the target's corpse and fight under the Broodmother's control.
Number of spiders: 1/2/3/4
Effect duration 2 seconds
 Spin Web
Cost: 120 mana.
Cooldown: 10 seconds
Range of use: 700
Effect: Fires a parasitic egg sac on the specified target, dealing 75/150/225/300 damage, if the target is killed by this skill or shortly afterwards, the monsters Baby spiders will emerge from the target's corpse and fight under the Broodmother's control.
Number of spiders: 1/2/3/4
Effect duration 2 seconds
 Insatiable Hunger
Cost: 100 mana.
Cooldown: 45 seconds.
Effect: rage, increase damage and gain lifesteal on every basic attack
Bonus Damage: 60/80/100
Lifesteal: 60%/80%/100%
Effect duration: 14 seconds
 Silken Bola
Effect: Slows the specified target, dealing damage and giving them a chance to miss. Deals bonus magic damage when attacking this target.
Cooldown: 25% / 35% / 45% / 55%
Impact damage: 100 / 120 / 140 / 160
Bonus damage: 6 / 7 / 8 / 9
 Incapacitating Bite
Duration: 2
Miss Chance: 30% / 40% / 50% / 60%
Move Slow: 20% / 30% / 40% / 50%
Effect: cripple enemy units, cause attacks to slow and give the affected unit a chance to miss its attacks.
 Spinner's Snare
Effect: Broodmother creates a 900 width invisible web line. Enemy Heroes that cross the web line will make it visible and become rooted, visible in fog and receive 100dps for 4 seconds, after which the line is destroyed. Broodmother's team is notified in the Minimap whenever someone trips in a Web line. Multiple Heroes can trip on the same line until it's destroyed.
Formation Delay: 2
Cast Range: 600
Slow Duration: 0.25
Slow: 100%
Root Duration: 4
DPS: 100
Effective items guides
Early game
 Soul Ring
She can use Spawn Spiderlings more often without running out of mana, which lets her to annoy adversaries, take final attacks, and collect Spiderlings.
 Medallion of Courage
Medallion of Courage boosts mana regeneration, allowing Broodmother to continue spawning spiderlings, and its active state speeds up farm time.
 Aegis of the Immortal
Mid game
 Necronomicon
Necronomicon: This is the item that is required at this point, with its aura providing several advantages to pets. You should update this book to level 2, then upload it depending on the scenario. Level 3 is an option, or you can stay at level 2 until the end of the middle game.
 Orchid Malevolence
Orchid malevolence: Anyone who dares to approach your spider's web will be muzzled, and the mana index for utilizing the skill will be ensured.
Late game
 Assault Cuirass
Assault Cuirass: Broodmother and her spiders' attack speed and armor are increased by Assault Cuirass, but neighboring towers' armor is reduced. A great gadget that enhances Broodmother's abilities.
 Butterfly
Butterfly works nicely with Broodmother's passive, making it even more difficult for adversaries to strike her and increasing Broodmother's carry potential.
 Nullifier
Nullifier is beneficial against things like Ghost Scepter Ghost Scepter, as well as preventing foes from breaking Orchid Malevolence's quiet.
 Bloodthorn
Bloodthorn replenishes Broodmother's mana and enhances her damage output. Its active ability silences the victim while also granting True Strike to all enemies that are afflicted.
Situation items
 Boots of Speed
Speedy Boots If the adversary has numerous slows, combining her boots with her move speed boost will negate their impact.
 Hand of Midas
Hand of Midas: Broodmother's leveling is accelerated by the Hand of Midas, allowing her to attain her level 20 and 25 talents faster.
 Vladmir's Offering
Vladmir's Offering: VVladmir's Offering is a beneficial aura for Broodmother and her spiders.
 Mask of Madness
Mask of Madness: Mask of Madness provides cost-effective attack speed, which may be combined with Insatiable Hunger's extra damage for a low-cost rise in attack output.
Orchid Malevolence
Orchid Malevolence: Broodmother is helped by Orchid Malevolence in killing heroes that have abilities that let them to flee or weaken Broodmother. She's also figured out how to solve most of her mana issues.
 Desolator
Desolator: Broodmother's pushing and killing speed is increased because to Desolator's high damage and armor reduction.
 Diffusal Blade
Diffusal Blade: Diffusal Blade, in addition to its good stats, may be picked up early for an extra slow on foes.
 Pipe of Insight
Pipe of Insight: Broodmother can farm so quickly that picking up a pipe for the team can let her and her spiders survive massive magic bursts that would normally kill them.
 Radiance
Radiance: During team engagements, Radiance does area damage and increases the probability of becoming blinded. Broodmother can apply the burn to most foes since she is frequently in the midst of a team battle.
 Abyssal Blade
Abyssal Blade: Abyssal Blade provides a consistent stun as well as periodic bashes to severely incapacitate foes.
Enemies & Allies
Allies
 Chen
Chen
- Chen is an easy target for Broodmother as well as her Spiderlings because to his poor mobility and shortage of AoE skills.
- With Spawn Spiderlings and ambushing them through terrain in her web, Broodmother may effortlessly take out Chen's creeps.
 Drow Ranger
- Broodmother and her Spiderlings take advantage of Drow Ranger's lack of mobility.
 Enchantress
- Broodmother may swarm Enchantress with Spiderlings because she lacks AoE skills.
- Enchanted creeps may be killed by Spawn Spiderlings.
 Medusa
- Webbed regions may be exploited to hit and run, weakening her and launching ganks while covering ground quickly.
- Despite the fact that Medusa can readily chase down Spiderlings when given adequate range, an Incapacitating Bite will have her overrun in no time.
- Medusa seldom builds a BKB in order to fully benefit from Mana Shield, but Broodmother can equip a Diffusal Blade to burn away mana.
 Nature's Prophet
- If Broodmother creates a web, Sprout will be unable to safeguard Nature's Prophet.
- Because of Nature's Prophet's limited movement, he is vulnerable to Incapacitating Bite.
- Wrath of Nature does a lot of damage to spiderlings, thus they absorb a lot of it.
 Phantom Assassin
- The single target powers of Phantom Assassin render her powerless in the face of swarms of Spiderlings.
- Broodmother will generally have enough time to employ Spin Web to defend herself because Phantom Assassin is constantly reliant on critical attacks.
- Because she is reliant on physical strikes, Incapacitating Bite cripples her.
 Sniper
- Sniper is utterly defenseless against Incapacitating Bite, and Spiderlings in the lane may cause considerable damage.
 Treant Protector
- Living Armor is quickly melted away by spiderlings.
- However, Broodmother's vision from Eyes In The Forest might be harmful.
Counters
 Alchemist
- Greevil's Greed makes Broodmother's spiderlings significantly more valuable to Alchemist, making it crucial that he farms them, as compared to other heroes who have insignificant spider bounties.
- Acid Spray makes it tough to fight Alchemist in lane without losing some spiderlings to the additional damage, perhaps providing him farm that he would otherwise not have.
 Axe
Axe
- Broodmother and her spiderlings are forced to attack by Berserker's Call, enabling for massive quantities of pure damage to be dealt by Counter Helix.
 Ancient Apparition
- Ice Blast stops Insatiable Hunger from stealing your life, stops Spin Web regeneration, and kills spiderlings swiftly.
 Bristleback
- The majority of Broodmother's and her spiderlings' damage is reduced by bristleback.
- Quill Spray will kill all spiders in its path, limiting Broodmother's ability to battle and farm.
 Dark Seer
- In the landing phase, Ion Shell can kill Broodmother's spiderlings when used on a single spiderling in a cluster.
- Broodmother can be dragged out of the trees by vacuum.
 Dragon Knight
- Breathe Fire will eliminate Broodmother's spiderites while severely injuring and reducing the damage output of her spiderlings.
- Broodmother's and her spiders' damage is mitigated by Dragon Blood's enhanced armor and regen.
- At level 2 and higher, Elder Dragon Form deals splash harm to Dragon Knight's auto attacks.
 Earthshaker
- Aftershock, when used in conjunction with Enchant Totem, stops Broodmother from attacking Earthshaker without being stunned repeatedly.
- Spiderlings amplify Echo Slam, killing Broodmother, her swarm, and anybody else unfortunate enough to be close very instantaneously.
- Broodmother finds it difficult to continue assaulting adversaries (and lifestealing with Insatiable Hunger) without Black King Bar Black King Bar due to Earthshaker's large number of stuns.
 Elder Titan
- Due to its short cooldown and extended sleep duration, Broodmother's ability to push towers may be hampered.
- Elder Titan may get a lot of damage, armor, and movement speed from Astral Spirit's spiderlings.
- Broodmother and her spiderlings' base armor and magic resistance are negated by Natural Order, which amplifies most damage delivered to them.
Items Counter
 Spirit Vessel
- For a long time, Broodmother's regeneration is disabled by Spirit Vessel
 Blink Dagger
- Broodmother may be caught in the trees by using Blink Dagger followed by a disable
 Boots of Travel
- Broodmother's split pushing attempts are intercepted by Boots of Travel.
Abyssal Blade
- Crimson Guard, Vanguard Abyssal Blade and Crimson Guard, the majority of the Spiderlings' damage is negated by Abyssal Blade.
 Mjollnir
Many Spiderlings are easily wiped off by Radiance, Battle Fury, Maelstrom Maelstrom, and Mjollnir.
 Rod of Atos
Rod of Atos intervene to prevent Broodmother from fleeing.
Favorable Matchups
 Beastmaster
- Broodmother's swarm's damage output is improved by Inner Beast.
- Broodmother will pounce on targets identified by Primal Roar.
 Dazzle
- When used on a group of Spiderlings, Shadow Wave causes a lot of damage to adjacent opponents.
 Lifestealer
- When used on a Broodmother, Infest's speed in her webs might catch an adversary off guard.
- Broodmother will steal more than 100% of the damage she causes since the lifesteal from Open Wounds combines with the lifesteal from Insatiable Hunger. This lets Broodmother and Lifestealer triumph in situations where they are outnumbered.
Game plan
Early game
At the beginning of the game you need to level up and farm some items first. With Spin web (W), you can easily eat minions, poke enemies as well as have good healing ability. When you have reached lvl4 or higher and have a Soul ring, you are free to create spiders and poke enemies with Spawn Spiderlings (Q) or finish the target if possible. You need to be flexible in sticking to the ground by dropping silk near the forest to calculate the way back if there is danger, or necessary, to switch lanes in time.
Mid game
At this stage, you can still stick to a lane to split push or participate in a few small teamfights, but with the skill set, ganking and participating in small combat is really not suitable. In case you get ganked by the council, try not to take damage from champions, run into the woods to hide in or use the Town portal scroll to go home. With single targets that don't have to be your nemesis, just hit it boldly with no twists.
Late game
When you have enough equipment and maxed out your skills, you can already join the teamfight, or continue to split push like in the beginning and middle of the game, but with the pusher build style above, it is possible. Your odd push is still the best. In the case of total combat, except for the tanker, you can hit anyone else (prefer the cockroaches) because of your ultimate skill + equipment, you don't mind any game.